

Key Takeaways
Start here
Why Fluid Checks Matter
Prepare
What You'll Need Before You Start
Core skill
Engine Oil: Your First Priority
Go deeper
Coolant, Brake Fluid, and Other Essentials
Finish strong
Topping Off Safely and Knowing Your Limits
Why Fluid Checks Matter
Your car depends on a handful of fluids to keep metal parts from grinding, temperatures from spiking, and brakes from fading. When any one of them drops too low or degrades past its useful life, the damage that follows can be swift and expensive. The good news: spotting a problem early almost always costs far less than fixing the consequence of ignoring it.
Fluid checks are one of the most accessible forms of preventive maintenance a driver can perform. No specialized tools are required, and the information you gather in five minutes at home is the same information a shop technician gathers during a multi-point inspection. Understanding what you're looking at also helps you have more informed conversations with mechanics - so you're less likely to pay for work you don't need. For a broader view of how fluid maintenance fits into your vehicle's overall care, see our maintenance schedule guide.
Your Owner's Manual Is Your Best Reference
Every vehicle has slightly different fluid locations, reservoir shapes, and required fluid specifications. The walkthrough in this article gives you the general process, but always cross-reference with your owner's manual for your specific make, model, and year. If you don't have a physical copy, most manufacturers make digital versions available on their official websites.
What You'll Need Before You Start
Before you open the hood, gather a few basics:
- Clean lint-free rags or paper towels - for wiping dipsticks and catching drips
- A flashlight - engine bays are often dim even in daylight
- Your owner's manual - this tells you exactly which fluid types your vehicle requires
- Appropriate fluid for topping off - only add what the manual specifies; using the wrong type can cause damage
Park on a flat, level surface and turn off the engine. For oil readings, the engine should be cold or have been off for at least 10 minutes so the oil drains back into the pan. For some other fluids, a warm (not hot) engine is fine - but never work around a hot engine cooling system. Keep children and pets away from the work area, and avoid open flames near the engine compartment.
Check Fluids Before You Buy Supplies
Before purchasing any topping-off fluid, look up the exact specification in your owner's manual - not just the type, but the grade or standard (e.g., DOT 3 vs. DOT 4 brake fluid, or HOAT vs. OAT coolant). Using the wrong specification can cause more harm than running slightly low. When in doubt, ask a mechanic to confirm what your vehicle requires.
Engine Oil: Your First Priority
Engine oil lubricates and cools the hundreds of moving parts inside your engine. Checking it correctly takes about 60 seconds.
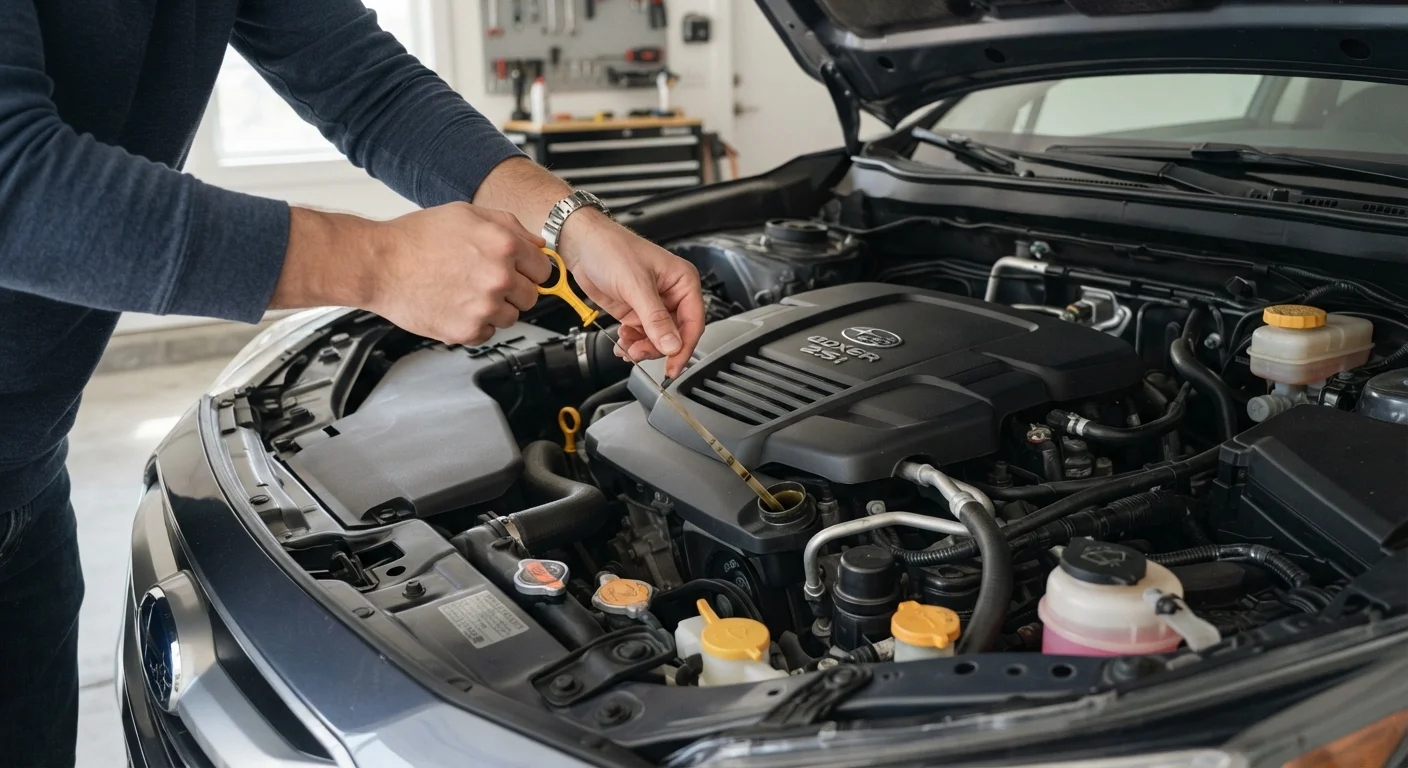
- Locate the dipstick. It typically has a brightly colored handle - yellow, orange, or red - and is labeled with an oil-can icon. Your owner's manual shows the exact location if you're unsure.
- Pull, wipe, reinsert. Pull the dipstick out and wipe it clean. Reinsert it fully, then pull it out again for an accurate reading.
- Read the level. The dipstick has two marks - MIN and MAX (or two holes, or hash marks). The oil film should fall between them. Below the MIN mark means you need to add oil.
- Check the condition. Rub a small amount between your fingers. Fresh oil is amber and slightly translucent. Black, gritty oil or oil with a milky appearance (which can indicate coolant contamination) warrants a visit to a mechanic.
If you need to add oil, use the grade listed on the oil filler cap or in your owner's manual (such as 5W-30). Add small amounts at a time through the filler cap on top of the engine, then recheck the dipstick. Overfilling is also harmful - stop at the MAX line. If your oil pressure warning light has come on, do not drive the vehicle until the level has been checked and corrected.
Coolant, Brake Fluid, and Other Essentials
Once you're comfortable with the oil check, the remaining fluids follow a similar pattern: locate the reservoir, read the level, assess the condition, and top off only with the correct fluid.
Coolant (Engine Coolant / Antifreeze)
The coolant reservoir is a translucent plastic tank, usually near the radiator, with MIN and MAX lines on the side. Check it visually without opening anything - the level is readable through the plastic. Coolant should be a bright color (green, orange, or pink depending on type) and free of floating particles. Never open the radiator cap when the engine is hot - the system is pressurized and can cause serious burns. If the reservoir is consistently low, a mechanic should inspect for leaks. Our guide to overlooked maintenance tasks covers why coolant flushes are often skipped too long.
Brake Fluid
The brake fluid reservoir sits on top of the master cylinder, near the back of the engine bay on the driver's side. It's a small translucent or opaque plastic container with a MAX/MIN range. Brake fluid should be clear to pale yellow; dark brown fluid suggests it's time for a flush. If the level is notably low, brake pad wear may be the cause - or there could be a leak. Either way, low brake fluid warrants a professional inspection before you drive.
Power Steering Fluid and Windshield Washer Fluid
Power steering fluid (on vehicles without electric power steering) has its own reservoir with a dipstick or MIN/MAX markings. Washer fluid is the most straightforward - it uses a dedicated reservoir marked with a wiper symbol and can be topped off with any commercially available washer solution. Do not substitute plain water in climates where freezing is possible.
Topping Off Safely and Knowing Your Limits
Topping off a fluid is not the same as solving the underlying problem. A reservoir that drops quickly after you've just filled it is telling you something is wrong - a leak, a worn seal, or a system in need of service. Make a note of how fast levels change between checks, and share that information with your mechanic.
A few firm rules for topping off:
- Only use the fluid type specified in your owner's manual. Mixing incompatible coolant types or brake fluid grades can degrade performance or damage components.
- Add fluid in small increments and recheck - overfilling certain systems can be as problematic as underfilling.
- Replace caps and covers securely before starting the engine.
Some tasks that touch these same fluid systems - full coolant flushes, brake system bleeds, transmission fluid changes on sealed systems - carry real risk if done incorrectly at home. For guidance on where the DIY line falls, see our DIY car maintenance guide. And if you're preparing for a longer drive, our road trip readiness checklist walks through a complete pre-departure inspection that includes fluid verification.
Building the habit of a monthly under-the-hood check is one of the most cost-effective things a driver can do. It keeps small issues from becoming large ones, and it gives you confidence that your vehicle is ready for whatever the road brings.
Viscosity grade
A number code (like 5W-30) that describes how thick an oil is and how it flows at different temperatures. Your owner's manual specifies the correct grade for your engine.
Dipstick
A long metal rod inserted into the engine that you pull out to measure the oil level. It has MIN and MAX marks so you can see where the level falls.
Coolant reservoir
A translucent plastic tank that holds engine coolant (antifreeze) and allows you to check the level without opening the pressurized radiator cap.
Master cylinder
The component that holds brake fluid and converts your foot pressure on the pedal into hydraulic force that activates your brakes.
Brake fluid flush
A service procedure in which old brake fluid is completely removed and replaced with fresh fluid. This is typically a job for a qualified mechanic, not a DIY task.
Coolant flush
A maintenance procedure that drains and replaces the engine's cooling fluid to remove contaminants and restore its protective properties. Consult your owner's manual for the recommended interval.